

How to Stretch a Photo (Without Making It Look Weird)
Learn how to stretch a photo to any size online, on your phone or in free editors, and how far you can stretch before faces and logos start to warp.
To stretch a photo, open it in a photo stretcher, type a new width and height, and download the result. That part takes under a minute. The hard part is knowing when to stop: a small stretch is invisible, but a big one makes faces look wide and turns round plates into eggs.
This guide covers both. You'll get the steps for your browser, your phone and two free editors, a quick way to work out how much a photo will stretch before you touch it, and what to do instead when the answer is "too much."
What Does It Mean to Stretch a Photo?
Stretching changes a photo's width and height by different amounts. Make a picture 30% wider without changing its height, and everything in it gets 30% wider too: the people, the buildings, the moon.
Resizing is different. It changes both sides by the same amount, so the photo gets bigger or smaller but keeps its shape. Stretching changes the shape itself.
That shape has a name, the aspect ratio. It's the width compared with the height, written as two numbers like 4:3 or 16:9. A 1600×900 photo is 16:9, because 1600 ÷ 900 works out the same as 16 ÷ 9. Every time you stretch a photo, you're moving it from one aspect ratio to another.
You can also change a photo's shape by cropping it or by fitting it inside a larger canvas, and neither one distorts anything. The guide to stretch vs resize vs crop vs fit puts all four side by side if you want to compare them before you start.
How to Stretch a Photo in 4 Steps
The quickest way is a browser tool. Here's how it works in Photo Stretcher, our free image stretcher:
- Add your photo. Drop a JPG, PNG or WebP (up to 20 MB) onto the page, click Upload Image, or paste a copied image with Ctrl+V (Cmd+V on a Mac). If you only want to experiment, Try a Sample loads a test picture.
- Pick Stretch mode. The tool has four modes. Stretch is the one where width and height move independently.
- Set the new size. Type the width and height in pixels, or open Choose size and pick a preset such as Portrait 4:5 or an Instagram Story.
- Check it, then download. Switch the preview to Compare to see the original and the stretched version together. Choose a format and click Download image.
The photo never leaves your device. Everything happens inside your browser, so nothing is uploaded to a server or stored, and there's no upload to wait for on a slow connection.
A few practical details:
- The output can be up to 4096 pixels on either side and 16 megapixels in total, which covers social media and most home prints.
- For photos, JPEG gives small files. PNG keeps transparency and loses no quality but makes bigger files. WebP is usually the smallest. Auto keeps whatever format you uploaded.
- If a website caps uploads at a certain size, turn on "Aim for a file size" and the tool picks the best quality that fits under your limit.
How Much Can You Stretch a Photo Before It Looks Wrong?
Before you stretch anything, it helps to know the percentage. You can work it out in three steps:
- Divide your photo's width by its height. A 1200×900 photo gives 1.33.
- Do the same for the size you want. 1600×900 gives 1.78.
- Divide the bigger number by the smaller one. 1.78 ÷ 1.33 = 1.33, so the photo is being stretched 33%. The target number was bigger, which means the photo gets wider. If it had been smaller, the photo would get taller.
If both numbers match, you get 1.00 and there's no stretch at all, however much bigger or smaller the photo gets. That's plain resizing, and it never distorts.
With the percentage in hand, use this as a starting point:
| Stretch | What to expect |
|---|---|
| Under 5% | Nobody will notice. |
| 5 to 10% | Fine for scenery. Faces and round objects may look slightly off to someone paying attention. |
| 10 to 20% | Only for backgrounds, landscapes and textures. |
| Over 20% | Visible in almost anything with people, text or familiar shapes. Use Fit or Crop instead. |
Here's how some common conversions work out:
| From → To | Stretch | Verdict |
|---|---|---|
| Phone portrait 3:4 → Instagram portrait 4:5 | 7% wider | Usually fine |
| 4:3 → 3:2 | 12.5% wider | Landscapes yes, portraits no |
| 3:2 → 16:9 | 19% wider | Backgrounds only |
| Square 1:1 → 4:5 | 25% taller | Noticeable. Add padding instead |
| 4:3 → 16:9 | 33% wider | Obvious. Crop or pad |
| 3:2 → 4:5 | 88% taller | Don't stretch |
| 16:9 → Story 9:16 | 216% taller | Never stretch |
If you'd rather skip the division, the aspect ratio calculator gives you any photo's ratio and can open the exact size straight in the stretcher.
The numbers get you close, and the Compare view settles it. If a face or a logo catches your eye as odd, anyone else looking at the photo will notice it too.
Which Photos Stretch Well (and Which Don't)
The same 15% stretch can be invisible in one photo and obvious in another. That's because we know exactly what a face or a wheel should look like, and nobody knows the correct width of a cloud.
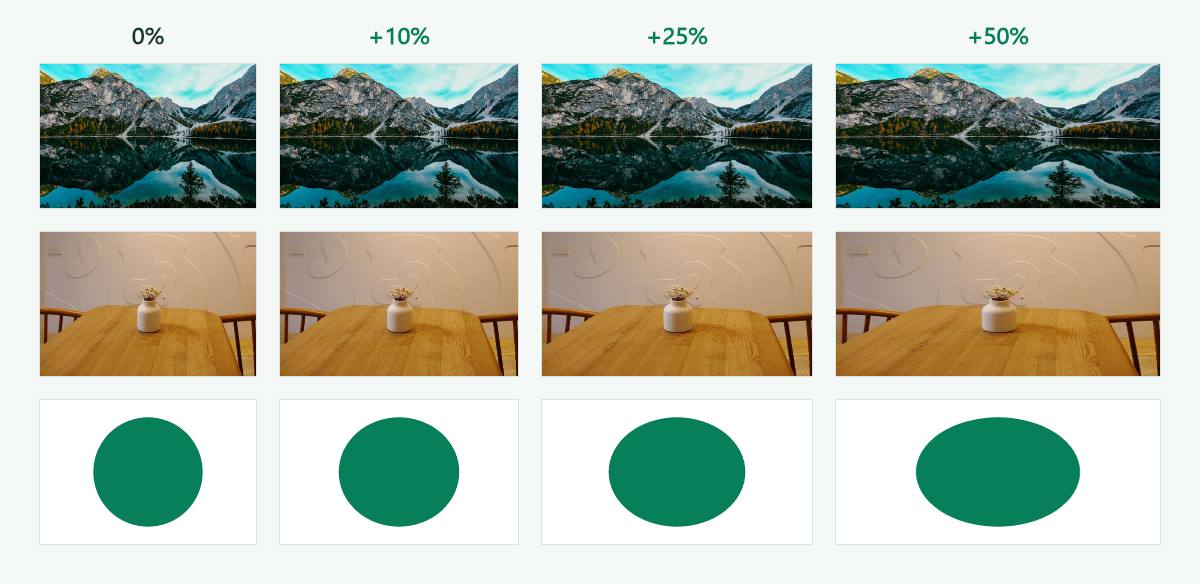
Photos that take a stretch well:
- skies, sea, fields and distant hills
- sand, grass, wood grain, fabric and other textures
- blurred backgrounds and bokeh
- abstract art and gradients
Photos that show every percent:
- faces and bodies (a horizontal stretch makes people look wider, and they will notice)
- anything round: wheels, plates, clocks, balls, most logos
- text, which looks wrong the moment the letters change shape
- buildings, furniture and other straight-edged objects with proportions we know
- product photos, where a distorted product misrepresents what a customer will receive
Most real photos mix both kinds: a person standing in front of an empty sky or a plain wall. For those, you can stretch only the background, which is covered further down.
How to Stretch Photos on iPhone and Android
The Photos app on iPhone and Google Photos on Android can crop a picture and switch it to a different aspect ratio, but they keep the proportions of what's in it. Neither one will stretch.
A browser tool works fine on a phone, and there's nothing to install:
- Open Photo Stretcher in Safari or Chrome.
- Tap Upload Image and choose a photo from your library.
- Pick Stretch, set the size and check the Compare view, the same as on a computer.
- Tap Download image. On iPhone, Safari saves it to the Files app, in the Downloads folder. Open it there and tap Share, then Save Image, to put it in your Photos library. On Android, it lands in your Downloads folder and usually shows up in Google Photos on its own.
Got a "can't be opened" message? iPhones save photos in a format called HEIC by default, and the stretcher only accepts JPG, PNG and WebP. Picking a photo straight from your library usually converts it for you. A HEIC file from the Files app, AirDrop or a computer might not be. Run it through the HEIC to JPG converter first, which also works in your browser, then stretch the JPG.
How to Stretch an Image in Free Editors
A desktop editor is worth opening when you want more control, and especially when you want to stretch only part of a photo. Both of these are free.
GIMP (Windows, Mac and Linux)
- Open your photo and go to Image > Scale Image.
- Click the chain icon next to Width and Height so it shows as broken. That unlinks the two sides.
- Type the new width and height, then click Scale.
- Save with File > Export As and pick JPG or PNG. GIMP's own Save command makes an .xcf project file, which most apps can't open.
Photopea (in your browser)
Photopea looks and works a lot like Photoshop, but it's free and runs in a browser tab.
- Go to File > Open and choose your photo.
- Go to Image > Image Size.
- Click the link icon between Width and Height to turn off the link between them.
- Enter the new size, click OK, then save with File > Export as > JPG.
A note on Canva
Dragging the side handles of a photo in Canva crops it rather than stretching it. Canva is great for layouts, but you'll get further with one of the tools above for this job.
How to Stretch Only the Background
This trick gets you a wider or taller photo without touching the person or object in it. It works best when there's plain space beside your subject: sky, sea, a painted wall or a studio backdrop. Here it is in Photopea:
- Go to Image > Canvas Size and add width (or height) on the side that needs more room. Set the anchor so the new space appears on that side. It will fill with blank canvas.
- Pick the Rectangular Select tool and select the strip of background next to the blank area. Stop just short of your subject.
- Go to Edit > Free Transform (Ctrl+T, or Cmd+T on a Mac) and drag the outer handle across until the strip fills the blank space. Press Enter.
- Deselect and export as JPG.
Because only the background moves, your subject keeps its shape. It falls apart when the background has a pattern you'd recognise, like brickwork, a crowd or close-up leaves, since the stretched side will look smeared next to the untouched side. Photoshop has a paid feature called Content-Aware Scale that does this automatically, but the manual version handles simple backgrounds well.
When Not to Stretch a Photo (and What to Do Instead)
When the percentage is too high, or the photo is full of faces and text, one of these usually gives a better result.
Fit (add padding). The whole photo goes inside the new shape, and the leftover space is filled with a color you pick. Nothing is distorted and nothing is cut off. This is the safe choice for social posts and product photos. Fit mode in the stretcher does it in one click, and the add padding to image tool gives you more control over the border.
Crop. The photo fills the new shape edge to edge, and whatever hangs over is trimmed. It's the right call when your subject sits near the middle and you can spare the edges.
Resize. If you only need the photo bigger or smaller and the shape is already right, resize it proportionally. That's no stretch at all.
AI extend. Some tools use AI to paint new scenery beyond the edges of the photo. It can look convincing on simple backgrounds. It's also making things up: expect odd extra fingers, repeating patterns and garbled text now and then. Avoid it for product photos, anything that has to be an accurate record, and official photos. Passport rules, for example, typically forbid digitally altered pictures.
The stretch vs resize vs crop vs fit guide shows how each mode works out the new size, if you want the arithmetic behind them.
Stretching Photos for Social Media and Print
Social media
When your photo doesn't match a platform's shape, the platform decides for you, usually by cropping the preview or adding bars. Instagram's feed, for instance, takes anything from 1.91:1 landscape to 4:5 portrait and crops whatever falls outside that range.
So check the stretch percentage against the table above before you post. A phone portrait going to Instagram's 4:5 (1080×1350) is a 7% stretch and usually fine. A landscape photo going into a Story or TikTok (1080×1920) is over 200%, so use Fit. The Instagram and TikTok size pages list each format, and the social media image resizer covers the other platforms.
Stretching a photo bigger doesn't add detail. To fill the new pixels, the software blends the pixels next to them, so edges get softer the further you go.
For a sharp print, aim for about 300 pixels per inch. Multiply each side of the print in inches by 300:
| Print size | Pixels needed |
|---|---|
| 4×6 in | 1200×1800 |
| 5×7 in | 1500×2100 |
| 8×10 in | 2400×3000 |
The shape matters here too. A 4×6 print is 2:3, the same shape as most camera photos, so it needs no stretch. An 8×10 print is 4:5, which is a 20% stretch from a 2:3 photo. That's why print shops crop 8×10s instead.
This guide is about digital images. "Photo stretching" can also mean wrapping a printed canvas around a wooden frame, which is a job for a print shop.
How to Fix a Photo That's Already Stretched
If a photo got stretched by mistake, you can usually squeeze it back.
If you know the original size, open it in Stretch mode and type that size back in. A 4:5 portrait that got squashed into a 1080×1080 square goes back to 1080×1350.
If you don't, look for something round or a face, then try the common shapes: 4:3, 3:2 and 16:9 (or 3:4, 2:3 and 9:16 for portraits). Keep the width, change the height, and watch the Compare view until the circle is a circle again.
The fix is rarely perfect. A photo that was squashed lost pixels that don't come back, and one that was stretched will look a little soft after you undo it. Keep your originals, and stretch a copy.
Frequently Asked Questions
Does stretching a photo reduce its quality?
Making a photo bigger in any direction softens it, because the software has to invent pixels by blending the ones next to them. Making it smaller keeps it sharp. Distortion is a separate issue: a stretched photo can be perfectly sharp and still look wrong if the shapes in it are off.
What's the difference between stretching and resizing a photo?
Resizing changes width and height by the same percentage, so the photo keeps its shape. Stretching changes them by different amounts, so the shape changes along with everything in the picture.
Can I stretch a photo without distorting it?
Only in two cases: when the stretch is small (under about 5%), or when you stretch only the background and leave the subject alone. For anything bigger, fitting the photo inside the new shape or cropping it gives a cleaner result.
How do I stretch a picture to fit a frame?
Measure the frame's opening, divide width by height, and compare that with your photo using the three steps above. Under about 10% on scenery, stretch it. Anything more, or any photo of people, crop it to the frame's shape instead.
Is there a free picture stretcher that doesn't upload my photos?
Yes. Photo Stretcher runs entirely in your browser, so your photo is never sent to a server or stored. Close the tab, and it's gone.
The Rule of Thumb
Before you stretch, divide width by height for both sizes and compare. Under 10% on scenery, go ahead. Over 20%, or any photo with faces or text, use Fit or Crop. If you're somewhere in between, the Compare view will show you which way to go.

 Photo Stretcher
About Sabir Ali
Founder of Photo Stretcher
I built Photo Stretcher because resizing an image online usually means uploading it to a stranger's server and hoping for the best. Everything here runs in your browser instead: a stretcher, a resizer, a KB compressor, a converter. Your files never leave your device, and no pixel is invented by AI.
I review every guide on this site before it goes live. If a method stops working, I update the guide.