

How to Change Aspect Ratio of an Image Without Cropping
Pad, fit or stretch a photo into a new shape and keep all of it: how to work out the exact padding, what each method costs, and which to use for which job.
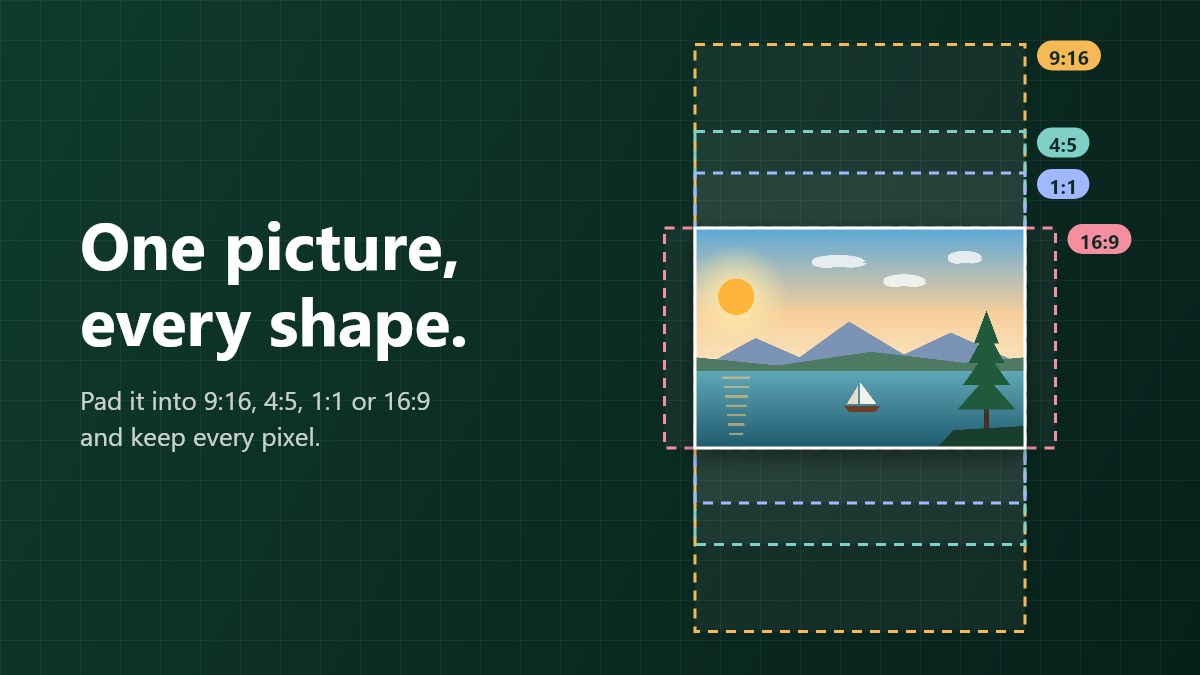
To change the aspect ratio of an image without cropping, add space around it instead of cutting pixels away. The photo stays whole, the canvas takes the new shape, and the new space is filled with a color, a blur or transparency. This guide shows how to work out the exact amount of space, which setting to use, and when a small stretch is an acceptable shortcut.
You'll need your photo and the shape you want, such as 1:1 for a square or 9:16 for a vertical story. Nothing is uploaded, because the tools in this guide run in your browser.
The Short Answer
Three methods change a photo's shape and keep all of it:
- Pad it. The Add Padding tool makes the canvas bigger and leaves the photo at its own pixel size.
- Fit it. Fit mode in the image stretcher scales the whole photo to sit inside an exact size and fills the rest with a color.
- Stretch it, but only for a small change. A few percent is invisible. Anything more bends the people and objects in the photo.
Cropping is the fourth method, and the only one that fills the new frame edge to edge. It does that by throwing away part of the picture, which is exactly what you're trying to avoid.
What Is Aspect Ratio?
Aspect ratio is the shape of a picture, written as width:height. A 1200 × 800 photo is 3:2, a square is 1:1, and a vertical phone video or story is 9:16. Two pictures have the same aspect ratio when one is the other scaled up or down, so 1200 × 800 and 600 × 400 are both 3:2.
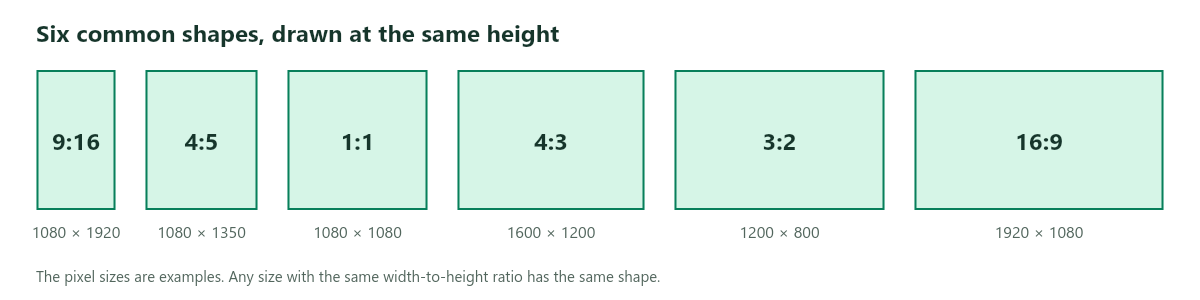
To find a photo's ratio, divide its width by its height and reduce the result. The aspect ratio calculator does that for you, and it also solves a missing side when you know the ratio you need.
Why Changing the Aspect Ratio Usually Costs You Something
When the shape you need differs from the shape you have, one frame can't hold the whole photo, keep its proportions and be filled by it all at once. Each method gives up one of the three.
- Crop keeps the proportions and fills the frame, but drops part of the photo.
- Padding keeps the whole photo and its proportions, but leaves empty space.
- Stretch keeps the whole photo and fills the frame, but distorts it.
Getting all three needs new picture content made up to fill the gap, which is what AI extension tools do. Every other method is a trade.
Cropping costs more than you might expect. Take a 1200 × 800 photo. Cropping it to a square keeps 800 × 800 pixels and discards 400 columns of the picture, a third of it. Cropping the same photo to 9:16 for a vertical story discards 63%. Whether that matters depends on what was in the cut part.
How to Change Aspect Ratio Without Cropping Using Padding
Padding adds room on the sides that need it and touches nothing else. The photo itself isn't resized, so no detail is lost. The whole job takes six steps.
- Work out the new canvas size and how much space each side needs. The next section shows how.
- Open the Add Padding to Image tool and add your photo. It accepts JPG, PNG and WebP.
- Switch the unit to px and untick Same on all sides.
- Type the padding for the two sides that need space and leave the other two at 0.
- Choose a background and check the New size line under the preview. It should match the size you worked out.
- Download the result as PNG, JPEG or WebP.
If your photo is HEIC from an iPhone, convert it to JPG first.
How to Work Out the Padding Yourself
You only ever pad two opposite sides. Which two depends on whether your photo is too wide or too tall for the shape you want.
If the photo is too wide for the target, as a landscape photo is for a square, keep the width and make the canvas taller. Multiply the width by the target height, divide by the target width, and subtract the photo's height. Half of what's left goes on the top and half on the bottom. Say a 1200 × 800 photo needs to become 4:5. Then 1200 × 5 ÷ 4 = 1500, and 1500 − 800 = 700. That's 350 pixels above and 350 below.
If the photo is too tall, as a portrait is for a square, keep the height and make the canvas wider. Multiply the height by the target width, divide by the target height, and subtract the photo's width. Say a 900 × 1200 portrait needs to become 1:1. Then 1200 − 900 = 300. That's 150 pixels on the left and 150 on the right.
As two lines you can copy: new canvas height = width × target height ÷ target width, and padding per side = (new height − photo height) ÷ 2. For a canvas wider than the photo, swap the roles of width and height.
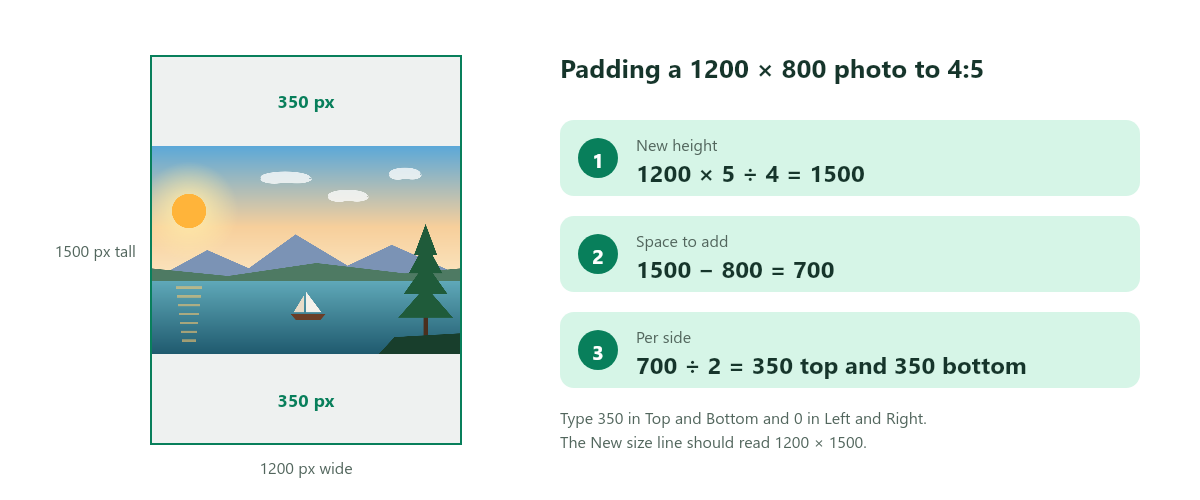
If the difference is an odd number, one side gets a pixel more than the other. Nobody can see it. If you have one side and want the other solved, the aspect ratio calculator does that arithmetic for you.
One Photo, Four Shapes
I worked through one 1200 × 800 photo for four common shapes. The padding numbers below are what the Add Padding tool reported as the new size, and the crop numbers are a center crop that keeps the full height or full width.
| Shape | Crop result | Cut off | Padded result | Photo fills the canvas |
|---|---|---|---|---|
| 1:1 | 800 × 800 | 33% | 1200 × 1200 | 67% |
| 4:5 | 640 × 800 | 47% | 1200 × 1500 | 53% |
| 9:16 | 450 × 800 | 63% | 1200 × 2134 | 37% |
| 16:9 | 1200 × 675 | 16% | 1422 × 800 | 84% |
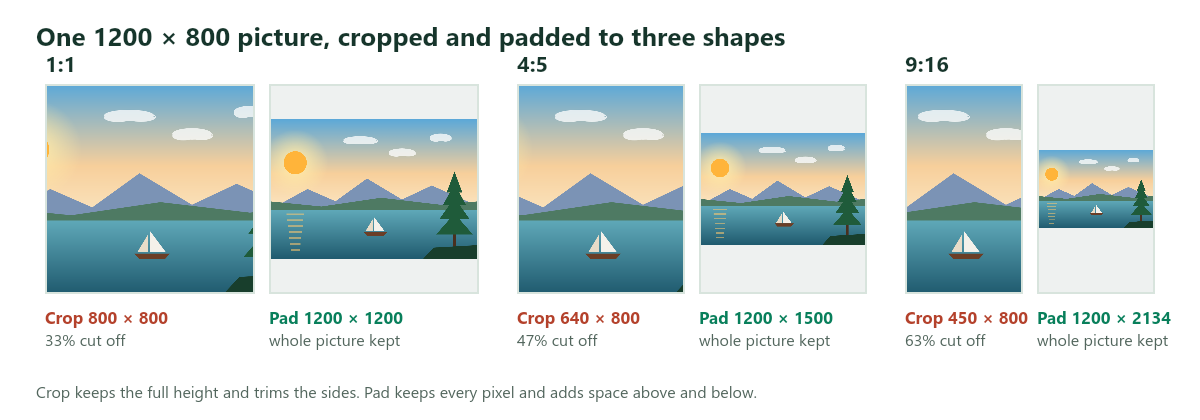
The table shows what padding costs: a smaller photo in a bigger frame. The taller the target shape, the smaller the photo looks inside it. At 9:16 the photo fills just over a third of the canvas, and the rest is background. The 16:9 row goes the other way: the target is wider than the photo, so the space goes on the left and right.
Choosing the Background
The background decides whether padding looks deliberate or like a mistake.
- White suits product photos and anything that will sit on a white web page, where the padding disappears into the page.
- A color taken from the photo, such as the sky or a wall, looks intentional on social posts. The tool has a color picker, or you can type a hex code.
- A blurred copy of the photo fills tall formats without flat bars. Raise the blur strength if the background pulls attention from the sharp photo in front.
- Transparent suits logos and cut-outs that will go on different backgrounds. Save as PNG or WebP, because JPEG has no transparency and turns the space white.
Fit to an Exact Size
Sometimes the target isn't a ratio but an exact size in pixels, such as 1080 × 1350. That's where Fit mode in the image stretcher is easier. Type the width and height, choose Fit and pick a background color. The whole photo is scaled to sit inside that size, centered, and the leftover space takes the color.
The difference from padding is who sets the final size. Add Padding leaves your photo at its original pixels and makes the canvas bigger. Fit gives you the exact output size you typed, and resizes the photo to make it fit. For a 1200 × 800 photo at 1080 × 1350, Fit scales it down to 1080 × 720, with 315 pixels of background above and below.
Fit starts with a white background, and you can change the color. Use it when a form or platform wants exact dimensions. Use padding when you want to keep every original pixel.
The two combine well. Pad to the right shape first, then bring the padded canvas to the exact pixel size with the image resizer. Setting the shape first and the size second means the resize never changes the proportions. The guide to stretch, resize, crop and fit compares all four modes on the same photo.
Stretch, but Only a Little
Stretching avoids both empty space and lost pixels, but it changes the shape of everything in the photo. It works when the change is small. A 900 × 1200 portrait is 3:4. Going to 4:5 means stretching it to 960 × 1200, which is 7% wider. That's usually fine for scenery or a product, but check faces and round objects before you use it.
The same move on a 3:2 photo going to a square makes everything 50% taller or a third narrower, and people and round objects look visibly squashed. The guide to stretching a photo without distortion has a table of how noticeable each percentage is. Under about 5% is safe, 10 to 20% only suits backgrounds, and anything over 20% needs padding or Fit.
What About AI Extend?
AI extenders, such as Photoshop's Generative Expand, grow the canvas and paint new content into the gap. That's a way to fill a new shape without cropping, padding or stretching. It also means part of the picture was never in your photo.
That's fine for a sky or a lawn in a social post. It's a poor choice for anything that has to be accurate, such as an ID photo, a product shot, a document or a picture of a real place. Our tools don't invent pixels, so padding is the safe option when the whole photo has to stay as it was.
Which Method for Which Job
| Job | Method | Why |
|---|---|---|
| Product photo for a square listing | Pad with white | Keeps the whole product and blends into a white page |
| Landscape photo in a vertical story | Pad with a blurred background | Avoids flat bars around a small photo |
| A form that wants exact pixels | Fit, or crop | Fit gives the exact size. Crop if the face has to fill the frame |
| 8 × 10 print from a 3:2 photo | Pad or crop | 8 × 10 is 4:5, so decide which edge you can lose before you order |
| 3:4 portrait into 4:5 | Stretch | 7% is fine for scenery and products. Check faces first |
| Logo or cut-out for different backgrounds | Pad with transparency | Save as PNG or WebP so the space stays see-through |
Many ID and exam portals check the picture itself, and a padded photo may be refused. When the rules say the face has to fill the frame, crop instead. The guide to digital passport photo requirements shows what the official pages ask for. If a form rejects the file for another reason, this guide to photo upload errors covers the other checks.
If the target is a social platform, the social media resizer has the sizes preset, and its Show whole photo option keeps the full picture on a blurred or colored background, so you don't have to work out the padding yourself.
Mistakes That Make the Result Look Wrong
- Padding all four sides when only two need it. The result comes out a different shape from the one you wanted. Check the New size line before you download.
- Saving transparent padding as a JPEG. JPEG fills it with white, so a logo ends up with a white box around it.
- Padding an already padded copy. Each pass re-saves the file, so go back to the original and pad once.
- Padding a very large photo. If the padded image would pass 4,096 pixels on a side or 16 megapixels, the tool scales the whole result down and tells you by how much.
- Stretching faces to avoid padding. A distorted face is easy to spot, and padding is the safer fix.
Frequently Asked Questions
How do I change the aspect ratio of a photo online for free?
Open the Add Padding tool in your browser, add the photo, type the padding for the two sides that need space, and download the result. It's free, needs no signup and adds no watermark. Nothing is uploaded.
Can I change the aspect ratio without cropping or distorting the photo?
Yes, with padding or Fit. Both keep the whole photo at its true proportions. The cost is empty space around it, which you can fill with a color, a blur or transparency.
Does padding lower the quality of the photo?
The photo is drawn at its original pixel size, so no detail is lost. PNG keeps every pixel exactly. JPEG and WebP are saved at 92% quality, which is usually hard to tell from the original.
How do I find my photo's aspect ratio?
Divide the width by the height, or type both numbers into the aspect ratio calculator. A 1200 × 800 photo is 3:2, and a 900 × 1200 photo is 3:4.
Can I do this on an iPhone without cropping?
Yes. The Photos app only crops, so use the browser tools instead. Open the Add Padding tool in Safari, choose the photo from your library and download the padded copy.
The Short Version
To change a photo's aspect ratio without cropping, pad it, fit it or stretch it a little. Work out the new canvas size first, add space to only the two sides that need it, and pick a background that suits where the photo is going. Keep the original file, so you can start again with a different shape.

 Photo Stretcher
About Sabir Ali
Founder of Photo Stretcher
I built Photo Stretcher because resizing an image online usually means uploading it to a stranger's server and hoping for the best. Everything here runs in your browser instead: a stretcher, a resizer, a KB compressor, a converter. Your files never leave your device, and no pixel is invented by AI.
I review every guide on this site before it goes live. If a method stops working, I update the guide.