

How to Reduce Image Size Without Losing Quality
Why a PNG photo is 8 times bigger than the same JPEG, how much pixels and quality really save, and the order to change things in, with measured results.
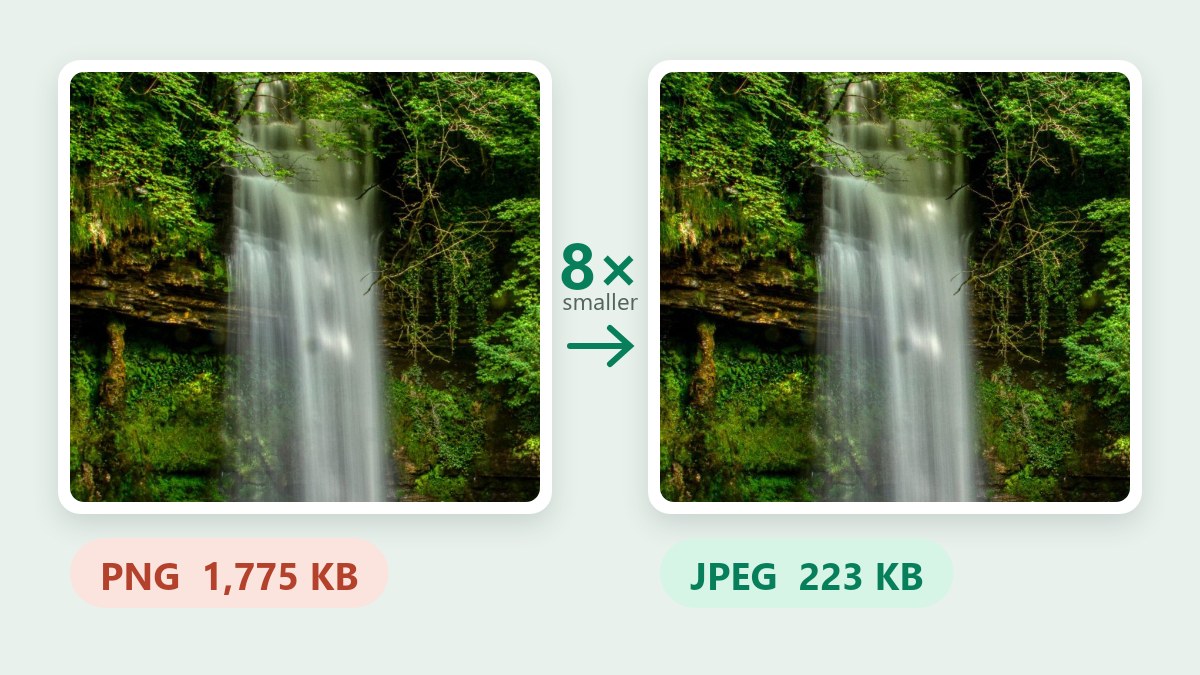
A 1200 × 800 photo saved as a PNG came out at 1,803 KB in my test. The same pixels saved as a JPEG came out at 226 KB, about eight times smaller, and the two look the same. Most photos that are "too big" were saved in the wrong format, and fixing that doesn't touch the picture.
This guide shows how to reduce image size without losing quality: what to change, in what order, and what each change costs. The numbers come from saving three sample photos in different formats, sizes and quality settings, so you can see how much each choice saves before you make it.
What "Image Size" Actually Means
People use "image size" for four different things, and only two of them decide whether an upload works.
| Term | What it measures | Changes the file size? |
|---|---|---|
| Dimensions | Width and height in pixels, such as 1200 × 800 | Yes, a lot |
| File size | Storage the file takes, in KB or MB | It is the result |
| Compression | How much detail the format throws away | Yes, a lot |
| DPI | A number saved in the file that tells a printer how big to print | No |
Upload limits are about file size. Form fields like "600 × 600" are about dimensions. When you're told to "reduce the size," check which one you've been asked for before you change anything.
DPI is the most repeated bad advice, so it gets a note. It's a label inside the file. Changing a photo from 300 DPI to 72 DPI without changing its pixel dimensions leaves the pixels untouched, and the file stays the same size. Only the pixel count and the compression move the file size.
Can You Really Reduce Image Size Without Losing Quality?
Partly. It depends on what you mean by losing.
Lossless compression shrinks a file and returns exactly the same pixels when you open it. PNG (Portable Network Graphics) works this way. It suits logos and screenshots, but a photograph saves little, because photos are full of fine, noisy detail that doesn't pack down.
Lossy compression throws information away. JPEG, named for the Joint Photographic Experts Group, does it, and so do WebP and AVIF. These formats are designed to discard what the eye is least likely to miss, such as tiny differences in color and very fine texture. At a sensible setting the loss falls below what you can see at the size the picture is viewed. That's what most people mean by "without losing quality": the file is smaller and nobody can tell.
Push the setting far enough and the loss shows up as soft edges, blocky patches and banding in skies. The aim is to stop just before that point, and the rest of this guide shows where it is.
What My Tests Showed
I took three sample photographs, a mountain lake (1200 × 800), a vase (900 × 1200) and a waterfall (800 × 1200), and saved each one several ways. File sizes are in KB.
| Photo | PNG | JPEG, quality 80 | WebP, quality 80 | JPEG at 75% size | JPEG at 50% size |
|---|---|---|---|---|---|
| Lake | 1,803 | 227 | 172 | 126 | 64 |
| Vase | 937 | 103 | 48 | 50 | 24 |
| Waterfall | 1,775 | 223 | 168 | 131 | 69 |
The chart shows the lake photo's five sizes as bars.
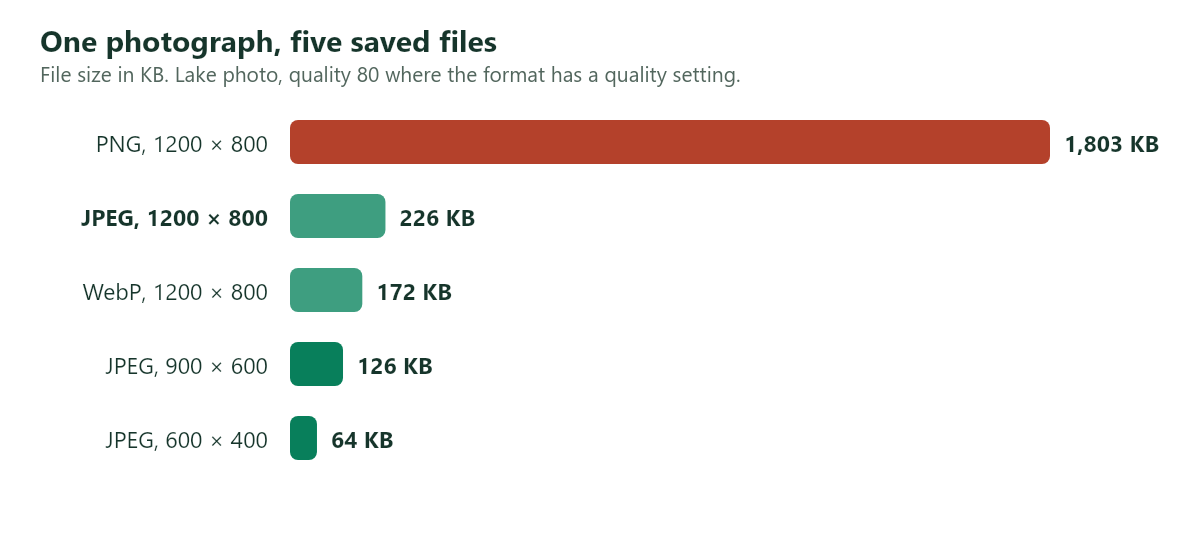
Four results stand out.
The PNG versions were 8 to 9 times larger than the JPEGs of the same photos. If you change only one thing, stop saving photographs as PNG. The same holds after an edit: in the guide to making a photo black and white, a rooftop photo comes out at 627 KB as a PNG and 117 KB as a JPEG.
WebP was smaller again. At the same quality number it came out 24% to 54% smaller than JPEG. A quality setting of 80 doesn't mean the same thing in two formats, though, and a pixel-by-pixel comparison scored the WebP files slightly lower. So WebP gave a smaller file at slightly lower fidelity, which is a good trade for a web page and a poor one if you plan to edit the file again. Google released WebP in 2010, and its WebP documentation reports lossy files 25% to 34% smaller than comparable JPEGs, which fits what I saw on two of the three photos.
Pixels were the strongest lever. Halving the width and height cut the files by 69% to 77%, which makes sense, since half the width and half the height leaves a quarter of the pixels.
Lowering the quality setting also works, with a visible cost. Dropping from 80 to 40 cut the same photos by 52% to 67%, and the comparison further down shows what that looks like.
All of this comes from three photos and one encoder. Quality numbers differ between programs, so 80 in one tool is not 80 in another. Read the sizes as the order of magnitude, not as a promise.
How JPEG Compression Works in Plain Terms
A JPEG doesn't store pixels one by one. The encoder cuts the picture into small blocks, describes how much fine detail each block holds, and then rounds that detail down. The quality setting controls how hard it rounds. It also stores color at a lower resolution than brightness, a step called chroma subsampling, because the eye notices changes in brightness far more than changes in color.
At a high setting the rounding is gentle and you can't see it. At a low setting, neighboring blocks round differently and the seams show up as blocky patches. Sharp edges pick up a faint halo too. That's why the lake photo looks blotchy at the water's edge when the quality is cut to 40, and why text and logos look worse as JPEGs than as PNGs. Edges are where rounding shows first.
It also explains why the same quality setting gives such different file sizes. Smooth skies and skin round down to almost nothing, while foliage, water and fabric hold detail everywhere. In my test, fitting a photo under 100 KB at its full size needed a quality of 77 for the vase and about 40 for the lake and the waterfall. The vase is mostly smooth surfaces, and the other two are packed with texture.
The Order to Do It In
Do these in order. Each step makes the next one cheaper, and you can often stop after the third.
- Start from the original. Work from the file the camera or designer gave you, not a copy that has been through a messaging app or a screenshot. Every lossy save of an already compressed copy adds damage you can't undo.
- Crop what you don't need. Fewer pixels is the biggest saving, and cropping removes pixels without making anything blurrier.
- Resize to the largest size anyone will see. A modern phone photo is often 4000 pixels wide. If it will be shown at 800, the other 3,200 are dead weight. The image resizer sets exact pixel dimensions with the proportions locked, so nothing gets stretched.
- Pick the format. Use JPEG for photographs, WebP where it's accepted, and PNG only for flat graphics, text and transparency. If the photo is a HEIC file, the default on iPhones since iOS 11, convert it to JPG first.
- Set the quality. A setting between 75 and 85 is a safe range when you compress an image that's a photograph. If you have a hard KB limit instead, the Resize Image to KB tool searches for the highest quality that fits under it. If a form keeps rejecting your photo, the guide to fixing a photo upload error explains what each message means.
- Check the result at the size it will be viewed, not zoomed in to 400%.
- Strip metadata if the limit is tight. Phones write camera details, a location and sometimes a preview image into the file as EXIF data. That's a few kilobytes, nothing on a 2 MB photo and noticeable on a 20 KB target.
The Same 100 KB, Spent Two Ways
When a limit is firm, you have two ways to hit it, and they don't look alike. I took the lake photo to just under 100 KB both ways.
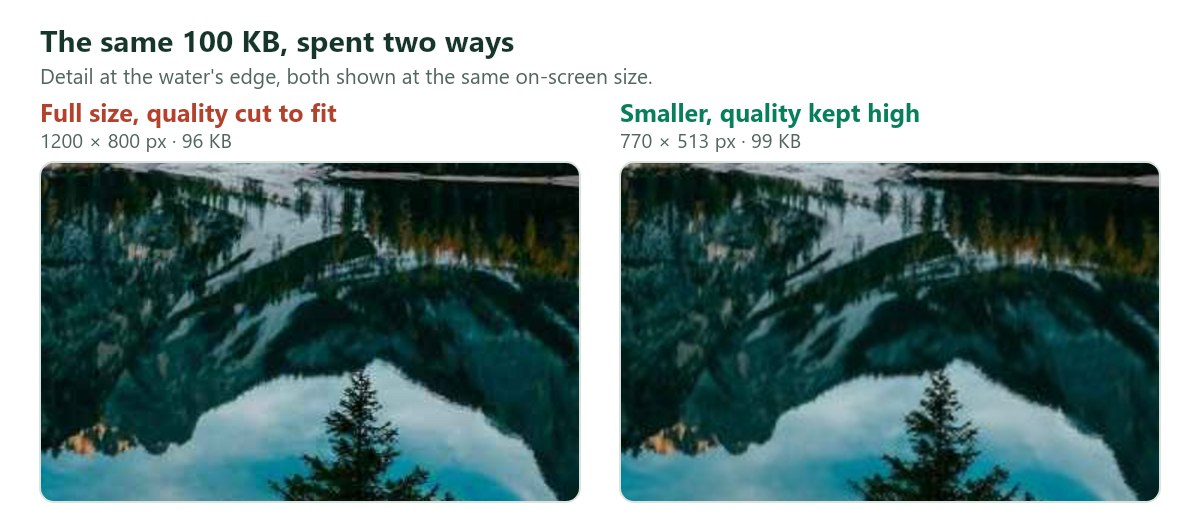
On the left, the photo keeps all its pixels and the quality is cut hard to fit. The blocky patches in the dark water are the compression showing. On the right, the photo is shrunk first and saved at quality 80. It's softer when you zoom in, but it has no blocking.
Which one is better depends on where the picture ends up. If it will be viewed at under about 800 pixels wide, as in most forms and web pages, the smaller version looks cleaner and you lose nothing anyone sees. If someone might zoom in or print it, the larger one holds more detail, rough edges included.
Our Resize Image to KB tool tries quality first and reduces the dimensions only when quality alone can't reach the target. If the result at your limit looks rough, shrink the pixels yourself first, then compress. It takes half a minute and often looks better.
Common Mistakes That Make Photos Bigger or Worse
- Saving a photograph as a PNG. That's the 8× penalty from the table above.
- Dropping the DPI. As covered earlier, it changes nothing about the file.
- Taking a screenshot of a photo. That re-encodes it at the screen's resolution, usually with fresh compression on top of the old.
- Enlarging a photo and then compressing it. Making a photo bigger adds bytes and no detail.
- Stretching it to fit. Changing the width and height by different amounts distorts everything in the picture. Keep the ratio locked, or crop. The guide to stretching a photo shows how far you can push it.
- Compressing past a form's minimum. Some official forms set a floor as well as a ceiling. Canada's digital passport photo, for example, must be at least 200 KB. The guide to digital passport photo requirements lists the limits for other countries.
Repeated saving gets blamed more than it deserves. In my test, saving the same photo five times at the same setting left the file size within 0.1 KB of the first save, and the measured difference from the original grew only slightly. Stacking different lossy steps is where the harm comes from, and detail that has been discarded never comes back. Keep your original.
Which Format for Which Image
| Image type | Best format | Why |
|---|---|---|
| Photograph for a web page | WebP or JPEG | Small files, with a quality setting you control |
| Photograph for a form or email | JPEG | Accepted almost everywhere |
| Screenshot, logo or text | PNG | Sharp edges, no blur around letters |
| Image with a transparent background | PNG or WebP | JPEG can't hold transparency |
| iPhone photo (HEIC) | JPEG | HEIC is small, but many sites reject it |
AVIF (the AV1 Image File Format) is newer than WebP and often smaller still, but upload forms and older software support it unevenly. For anything you're sending to someone else, JPEG remains the safe choice.
For the measured comparison of the two most common formats, see PNG vs JPG.
How to Reduce Image Size on a Phone or Computer
You don't need to install anything. A browser tool works on any device, and because it runs locally, the photo isn't uploaded.
- Open the Resize Image to KB tool and drop in a JPG, PNG or WebP of up to 20 MB.
- Pick a preset or type your own limit.
- Choose JPEG as the output format for a photograph.
- Select Resize Image and compare the result with the original.
- Download it.
If you'd rather use what's already on your computer, Paint on Windows has a Resize button on the Home tab that works in pixels. Preview on a Mac has Adjust Size under Tools, plus a quality slider when you export as JPEG.
On an iPhone you can stop the problem at the source. Under Settings, Camera, Formats, choosing Most Compatible makes new photos JPEG instead of HEIC.
Free Editors That Show the Size as You Go
A desktop or browser editor is worth opening when you want to watch the file size change while you move the quality slider.
- In GIMP, choose File, then Export As, give the file a .jpg name and click Export. The JPEG dialog has a Quality slider, and ticking "Show preview in image window" shows the resulting file size.
- In Photopea, which runs in a browser tab, choose File, then Export as, then JPG. The dialog has a quality slider and shows the estimated size.
- Squoosh, a free app from Google Chrome Labs, runs in the browser and shows the original and the compressed version side by side, with a choice of JPEG, WebP and other formats.
All three let you hunt for the lowest quality that still looks right. When you already know the limit, the KB tool above does the search for you.
If you run a website, file size feeds into page speed. Large images slow the Largest Contentful Paint, one of the Core Web Vitals Google measures, and web.dev's guide to LCP gives 2.5 seconds as the threshold for a good score.
Frequently Asked Questions
Can you reduce image size without losing any quality at all?
Only with lossless compression, and the saving on a photograph is small. In practice, "without losing quality" means the loss is too small to see at the size the image is viewed. That's achievable for most photos at a quality setting around 75 to 85, or by shrinking dimensions that were larger than needed.
What's the best way to reduce image size for free?
Resize to the largest size that will actually be shown, save as JPEG or WebP at a quality of 75 to 85, and check the result. A free browser tool such as our Resize Image to KB tool does it without uploading the file or adding a watermark.
How many KB should a website image be?
There's no official number. As a rule of thumb, a photo inside an article is comfortable at 100 to 200 KB and a large header image at 200 to 400 KB, though the right figure depends on the dimensions and how much detail the photo has.
Does reducing the file size reduce the dimensions?
Not necessarily. Compression changes the file size and leaves the pixels alone. The dimensions change only if you resize, or if compression alone can't reach a tight limit and the tool reduces them to get there.
Does changing DPI make a file smaller?
No. DPI is a print label. It doesn't change the number of pixels, so it doesn't change the file size.
The Short Version
Format and pixel dimensions do most of the work. Save photographs as JPEG or WebP, resize to the size that will actually be shown, and set the quality near 80. For a hard limit like 100 KB, try both routes and keep the one that looks cleaner at the size it will be seen. Keep the original so you can try again.

 Photo Stretcher
About Sabir Ali
Founder of Photo Stretcher
I built Photo Stretcher because resizing an image online usually means uploading it to a stranger's server and hoping for the best. Everything here runs in your browser instead: a stretcher, a resizer, a KB compressor, a converter. Your files never leave your device, and no pixel is invented by AI.
I review every guide on this site before it goes live. If a method stops working, I update the guide.